
I chose this kit, from Mcqueenie Miniatures, because the undercarriage looks very authentic, the wheels look real and I love the fact that it came with some of the built ins. Also, because it is fairly plain on the outside, I can decorate it my way.
So, the build begins:

Opening the box is always intimidating! So many pieces! So much work to do! But, the thought that I will turn this pile of kits into something three dimensional is exciting!
The first job is to pick the colors of course. Always difficult. After looking at many vargos on line and doing a bit of research I decided that red and yellow and gold where my favorite. I learned that many gypsies took a great deal of pride in their wagons and spruced them up as elegantly as possible. So, I wanted to honor that and make my wagon look very elegant. Well, I will try anyway!


So, at this point I tried to do a bit of the ornate painting, like the gypsies did to decorate their wagons, but guess what ? It was too darn hard to do! No matter how small the paint brush I used was, I just couldn't get the nice smooth lines I wanted. I tried using ver fine pointed pens as well, but just couldn't get the right colors! What I needed was some sort of stencil! But, where would I find stencils small enough?? Then I had an epiphany! Flower soft makes stickers that are very small what if I could use those somehow? So, here is what I did;

First I painted the stairs in my base color.

Then I added the red in the center of where I wanted my decorative painting to be;

I looked thru all my Flower Soft stickers and picked the one I liked.

I carefully stuck it onto my red color, repositioning it until I liked the placement. I rubbed it down with my nail to make sure that it was completely adhered.

Then I painted my main color over the sticker. This took two coats of paint.
Then, after it dried, I slowly removed the sticker!

As you can see, it looks pretty good! I took the sticker off a bit too soon, of course, so I had to do some touch up painting but for the most part, it looks a lot better than what I would have been able to do by free styling it by hand!
I apologize for my very messy work bench. If you stood at my work bench and turned around 180 degrees you would see my husbands very pristine workbench. But, alas, no matter how often I clean mine, I always end up with about six square inches of work space. I am like a mad scientist when I start working, stuff flies everywhere!

So, after discovering the flower soft sticker idea, I just kept going with it on all of the different undercarriage parts.


I apologize for my very messy work bench. If you stood at my work bench and turned around 180 degrees you would see my husbands very pristine workbench. But, alas, no matter how often I clean mine, I always end up with about six square inches of work space. I am like a mad scientist when I start working, stuff flies everywhere!

So, after discovering the flower soft sticker idea, I just kept going with it on all of the different undercarriage parts.
I should add that the wheels in this kit are made out of metal. So, to prep them for paint I first sprayed them with a metal primer. I borrowed the primer from my hubbies stash and it was actually some sort of barbecue spray paint!
I am not using the wood trim that came with the kit for the sides of the wagon because I wanted to do my own thing. Here I just painted two plain pieces of wood across the sides of the wagon. One is on top of the window and one below. I then added a piece of decorative would trim below the bottom one. It is hard to tell but all the painting on the undercarriage is yellow and all the trim on the body of the wagon is actually gold.
Here is the back of the wagon so far. I really wanted ponies on it since the gypsies really love their gypsy horses. I used some Jolee's for scrapooking ponies as templates. They came in three pieces, the mane, the tail and the body. But, I realized that they were too big. So, I carefully cut the three pieces apart and traced around them on plain paper flipping my template over so I would have mirror copies. Then, I reduced the drawings on my printer. I then glued them onto index cards. I cut them out, glued the mane and tail back on and painted them gold. The fact that the mane and tail were done separately, makes them three dimensional. It's hard to tell on the pics but it looks pretty good in person.
On this side, I have added the chicken coop and some more wood trim. The vertical wood trim is porch railing that I cut in half length wise. I do have a wonderful Preac mini table saw so I was able to do this. I don't think it could be done by hand but I could be wrong. The problem is that some of the pieces are thicker than others and this really bothers me. No matter how hard I tried to center my cuts, it just was never perfect. I will have to think about this some more!
If you have any ideas or constructive criticism please let me know. I could certainly use advice and ideas to help with this build!
Two steps forward, one step back. I really didn't like the fact that many of my posts were not the same depth because when I cut them in half the blade wasn't centered. I can't live with it so I tore them all off and started over. Good thing that I had another package of them!


Sorry that the picture is blurry. But, I am so much happier with the results. It was worth it to spend an entire evening re-doing it because I know that if something is off it will bug me every time I look at it.
Now, that the wooden posts are looking good-I removed them yet again to paint behind them. I tried the same sticker technique which I used on the other pieces. I must say-I am trying to stay calm but I am sporting a cheshire cat grin on my face. I'm so stinking happy that I came up with this idea. (I'm sure I'm not the first person to do so). Never the less, I am padding myself on the back!
Here is how it's done.

 I painted a couple of coats of the gold. This is a reverse stencil technique-so the gold is the color I want the pattern to be. The parts I cover up with the stencil will remain gold. Keep looking at the pictures and it will make sense.
 These are the "flower soft" stencils I used.
 I stuck them over the gold and rubbed them down really well with my nail. It is important to make sure that every piece is sticking very well.

Now it is time to paint over the entire thing. The parts covered by the stencils will remain gold.
 It took a couple of coats.

Then I let it dry very well.
 Now, the fun part-removing the stencils. Slowly carefully. Holding my breath.
 Ta da ! The reveal!!
 Now it is time to glue the posts back on.
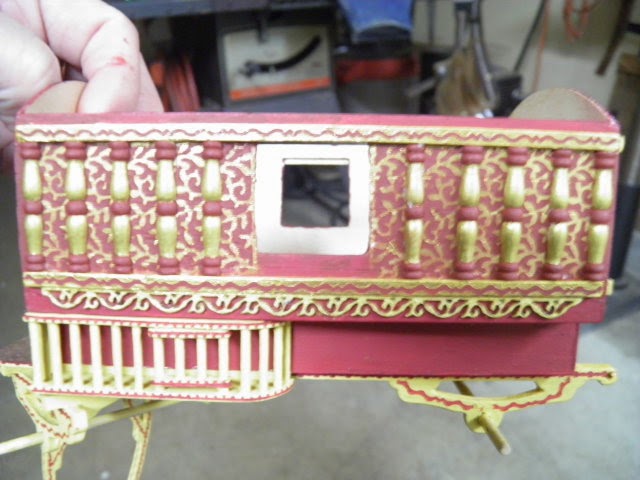
 Looking pretty good! And a whole lot better then if I had tried to paint all this by hand!!
I thought it was time to update the gypsy wagon. It is still not done yet but getting a lot closer. I have ordered an acrylic box to put it in but it hasn't arrived yet.
The roof hasn't been installed all the way yet. On the inside there is still some trimming that needs to be done. Of course I still need to add many more items to the outside. But here is some progress that I have made.


I need a lot of pillows but I hate making pillows!! Also need some pictures and trim. So, I still have a little ways to go but getting closer that's for sure!
Two steps forward, one step back. I really didn't like the fact that many of my posts were not the same depth because when I cut them in half the blade wasn't centered. I can't live with it so I tore them all off and started over. Good thing that I had another package of them!
It took me forever to adjust the blade just right but I think I finally got it!
So, back to painting and sanding and painting and sanding.
Time for red. I kept the ends of the post on until after I was done painting because it made it easier to hold onto them!
So, I painted them and then cut off the ends.
I cut the ends off by hand with one of those hand held choppers. Then it was time to glue them back onto the wagon.
Sorry that the picture is blurry. But, I am so much happier with the results. It was worth it to spend an entire evening re-doing it because I know that if something is off it will bug me every time I look at it.
Now, that the wooden posts are looking good-I removed them yet again to paint behind them. I tried the same sticker technique which I used on the other pieces. I must say-I am trying to stay calm but I am sporting a cheshire cat grin on my face. I'm so stinking happy that I came up with this idea. (I'm sure I'm not the first person to do so). Never the less, I am padding myself on the back!
Here is how it's done.
I thought it was time to update the gypsy wagon. It is still not done yet but getting a lot closer. I have ordered an acrylic box to put it in but it hasn't arrived yet.
The roof hasn't been installed all the way yet. On the inside there is still some trimming that needs to be done. Of course I still need to add many more items to the outside. But here is some progress that I have made.
Here is how I decorated the shelving units.
I still need to add trim around the door, as you can see. I replaced the divider around the bed. I used scrolled pieces that usually go around a door opening in a victorian house.
As always, I welcome any advice and or suggestions! Thank you!


